Wednesday, December 30, 2009

Imaging with High Dynamic Range (HDR)


What is HDR?
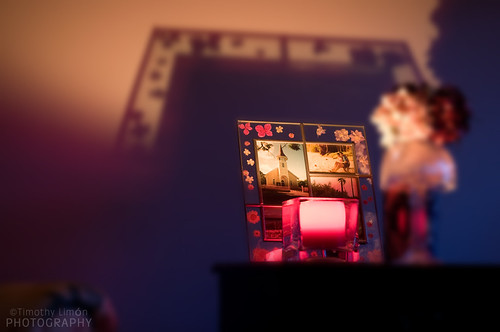
In order to compensate for image sensor limitations, photographers often combine several images to create a more realistic looking image. In the shot below, I combined 5 images to produce something close to what my eye sees when I look at this house at night.


Why Do it?
The human eye can see about 24 "stops" of dynamic range. Think of each "stop" as a doubling of the amount of light that our brain registers. When you look our the window on a sunny day, you can see the detail in the brightest objects as well as the detail in the darkest of shadows. 35 mm Film is able to capture about 14 stops of dynamic range. Even the best digital cameras can only capture about 11 stops which means that your fancy new DSLR is still lacking. Fear not, technology is constantly improving, and low light sensitivity is one area in which manufacturers can compete. In-camera HDR processing is already making its way to the market!

An Example
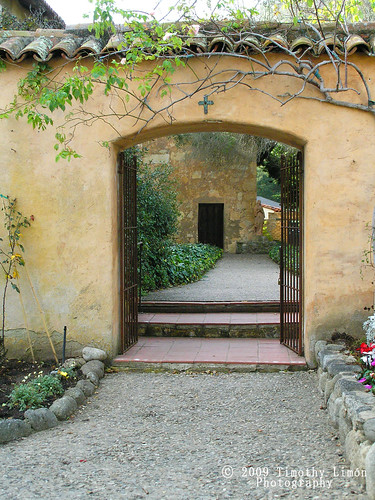
In the following picture, I exposed the sensor using 2 stops under the metered reading so as not to blow out the highlights in the image. As you can see, the shadows are completely void of detail.


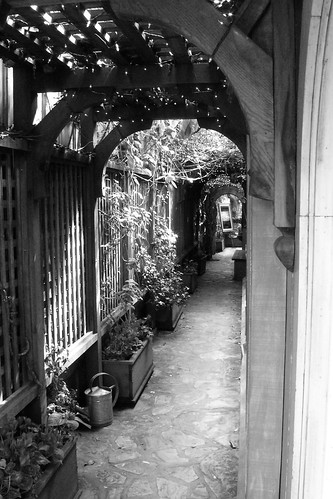
In this next image, I exposed the sensor 2 stops over the metered value to capture as much detail in the shadows as possible. Notice that the highlights are completely blown out, lacking any detail.


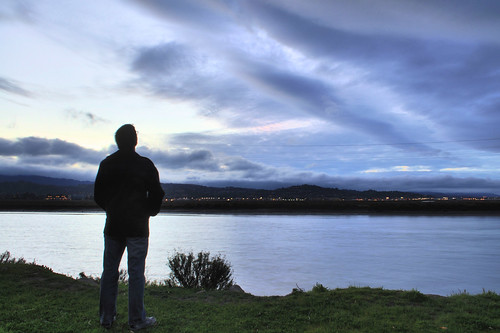
Using Photoshop CS4, I was able to merge the 5 images (-2, -1, 0, +1, +2 stops) into one 32-bit image, which captured all the detail in both the highlights and the shadows.

So...?
Most images we see on the web have a bit depth of only 8 bits. Converting the 32 bit HDR down to an 8 bit image gives us some control over the relative brightness of highlights and shadows. This is where the magic happens. In the screen shot below, you see the histogram (a graphical way of showing how many pixels are in which brightness ranges) Clicking and dragging on the line over the histogram allows you to adjust the brightness of each particular range.

The goal here
is to get the final image to show detail in the shadows without loosing the detail in the highlights. I want to see the sky, the street, and the Christmas lights, just like what my eye sees. Like most things in Photoshop, just grab the handle and drag it until it looks bad, then back off until it looks good.


The final image shows enough detail to look realistic without being over done. For more reading on this subject, see Trey Ratcliff's excellent tutorial.
A couple of final notes here: This image was created completely inside of Photoshop using the 32 to 8 bit conversion. The technique is the same in CS3 and CS4.

Friday, December 18, 2009

Timing


Oftentimes, timing is everything...
in making a good image. You've seen shots where the artist captured the moment just at the right instant to tell a particular story. Such is the case with this image crafted by my wife on a beach trip a few years back.

In this shot,
we see a young child, my daughter, about to hit a beach ball into the ocean; Her wet hand reflects the sunlight drawing attention and explaining her stance. Her sister looks away adding a bit of mystery to the image.

My wife has a good eye,
and often just looks through the viewfinder, waiting for the precise moment to press the shutter. This time it payed off!

So the next time
you see your child doing something fun, or the light is just right as your cat lounges, try viewing the scene through your viewfinder for a while. Anticipate the actions and press the shutter. If your timing is right, you may just be surprised at what you capture!

Monday, December 14, 2009

Make a Good Shot Even Better with a Model


When you look at this shot what do you see?
The rustic fence's strong lines draw the viewer naturally down the path. The bright patch in the clearing serves as a destination for the eye that makes this photo somewhat pleasing. Overall its not a bad journey. It evokes a calm and peaceful feeling as well.

Now, What would make this a better shot?
Placing a model at the end of the road would certainly help, but there are a few considerations first.

  1. What she's wearing can either make her stand out or loose her to the background. A tan coat would be a poor choice with the colors in the clearing.
  2. Stance goes a long way in creating a feeling. Should she be coming to greet you or walking away? Should she stand stable and confident, or a bit tentative and unsure?
  3. Using a prop can help tell the story. In this example, a brightly colored umbrella would serve to attract the viewers attention. The way in which the umbrella can say a great deal as well. If she holds it askew it evokes a tentative feel. Imagine a tightrope walker with an umbrella in one hand and an out stretched arm to keep balance.
With these in mind, have a good look at the image below:


You can see...
In this simple example how adding a model adds so much more to an image. It tells a story for the viewer and evokes feelings not present in the original image.

So...
The next time you raise the camera to your eye, think of how adding the human element could tell yet another story.

Enjoy!

Thursday, December 3, 2009

The TWiP Two Model Shoot


One event,
two stunning models, three wardrobe changes, six professional lights and... 100 Bay Area photographers... made for a great way to spend a Monday evening!

The event was sponsored by SmugMug, Peachpit publishing, BorrowLenses.com, and Eye-Fi, each donating time, personnel, and products that made for a successful shoot.

Arriving early,
gave me a chance to meet the sponsors, greet the models and make-up artist, and help set up some of the lighting. Little by little the group began trickling in and, when it reached "critical mass", our TWiP (This Week in Photography Podcast) host Frederick Van Johnson, began the introductions.

Each model took her place and started taking direction from photographers one by one. One of the studio sets used a Pro-photo lighting trigger similar to the pocket wizard, but with the ability to adjust the intensity from the hot-shoe mounted transmitter. Pretty convenient and so easy to dial it in. The only way to go with all the various camera brands in the room!

Continuous tungsten lighting
on the other set made for an excellent way to see how the lighting would look on each model without firing test shots. True WYSIWYG at its best. The soft boxes did a good job at keeping the talent cool.

Overall, the participants were cordial
and respectful of the subjects. Few took the time to actually direct: "Turn away slightly, chin forward, half smile, look up okay...". Later on the models stated they liked being directed. It gave them a chance to see what the photographer was after.


It must have been daunting
for the models: posing for two hours in front of a hundred photographers. (I wished they would have played "Paparazzi" by Lady GaGa.) One commented that her cheeks began to hurt from smiling so much. Poor thing!

The mood was electrifying:
Flashes popping every second, hundreds of cameras, and really good talent in the room made for some exquisite imagery. Passers-by asked what all the commotion was. One even thought that there were movie stars in the room!


It all ended too soon. Before I knew it, we switched off the lights, folded up the backdrops, and said goodbye to our new friends. Not bad for a Monday night!


Wednesday, November 18, 2009

Wow, what a surprise!


See 11/19/2009 update below...


Many of my friends
and family members know me as a computer geek. I've built PC's for years, constantly upgrading and tweaking, overclocking, etc... I know my way around the PC world pretty well. I've even dabbled in Linux and have built up servers for all my music.


Lately, since photography has "captured" my interest,
I've been noticing the limitations of PC monitors. I can really tell the difference now that I sell licenses on iStock. I spend hours tweaking things on the photo to increase the chances of having it accepted for sale. Now I notice the corners of the screen are a bit darker than the center. The upper left has a green tinge, while the lower right has a purple one. You can imagine how difficult it is to edit on something like this.


So...I decided to get a Mac,

The Macintosh screens are known for their quality and precision. Most photographers I know use macs exclusively. This would be my first one. The new iMacs just came out and I fell in love with the 27" version: the quad-core. I agonized for weeks over the decision and finally made it two nights ago.

The purchase experience was awesome; Whoever designed that should get a big pat on the back. No registers, staff handling the transaction form anywhere in the store are nice touches. I was in and out in no time; albeit a few thousand bucks poorer. Carrying the heavy box to the car was a bit of a chore. The box was pretty...pretty heavy!

Once I got home,
one of my daughters helped with the ceremonial "un-boxing" It was a hoot setting it all up. I plugged in the power, turned on the wireless keyboard and the "magic mouse". I reached behind the smooth round rear of this gorgeous piece of hardware, found the subtle power button and pressed it ever so gently. I felt giddy with excitement!
I heard the drive whir and the glorious chime that macs make when they start up. My daughter and I jumped back and rubbed our hands together.....

Then????

Nothing... I heard the start-up routing asking me to choose a language, but no lights, no signs video at all??? Bbbut this is a Mac! this isn't supposed to happen, ever!


I saw John Hodgeman smirking at me.

A quick call
to the Apple Store and I was invited to bring it back for a quick exchange. "Has this ever happened before?" I asked. "Not to the quad-core's the salesman answered" Hmmm Some of the Mac forums say otherwise. Maybe this is a first production run quality issue. I just hope they have a replacement in stock, one that works!


So tomorrow,
I'll schlep the pretty and heavy box back to get an exchange from the cheerful folks at the Apple store. I'll post again with the experience and hopefully it will be a *nice* surprise this time!

Update 11/19/2009
On my lunch hour today, I paid a visit to the apple store. I met a lovely sales associate there who brought a cart out to my car to gingerly transport my DOA mac into the store. After verifying that the screen was in-fact dead, she returned with a brand new machine. I was in and out in about 30 minutes. I'm writing this post from the replacement machine now. The whole experience was pretty nice. I'll give Apple credit for their customer service!

Tuesday, November 10, 2009

Macro Shots -- On the Cheap


Lately
I've been inspired by some of the macro photography seen on Flickr. Years ago I had a Minolta X700 SLR. Being a college student at the time, I had little money for gear. One thing I did have that was relatively cheap was something called a "Reversing Ring"

This little gem threaded onto the front of my 50 mm lens (my *only* lens) and allowed it to be mounted backwards. Flipping the lens around moves the focal point further in front of the film plane of camera which does two things:

  1. It increases the magnification
  2. It decreases the minimum focal distance (allowing you to get really close to your subject)

Essentially, using a reversing ring converts your 50 mm "portrait lens" into a really nice "macro lens" and it does so for less that 20 bucks! There are no additional optics involved. There are some drawbacks to the reversing ring however, is that neither the aperture or the auto-focus works.

Getting a bonafide macro lens will set you back about 500 dollars, but you get full aperture and auto-focus control. Still, the limited utility make this route hard to fathom for the average hobbyist. I mean, with a macro lens, you can only shoot macros, right?

There is another low-cost solution.
Something called an "extension tube" can accomplish the same task as the spendy macro prime lens, but only costs about 90 bucks. Kenko offers a set of three for about $170. An extension tube mounts onto the back of your lens and then onto the front of your camera. They have electrical and mechanical pass-through connections that operate both the aperture and the auto-focus system on some cameras. Tubes come in various lengths (measured in mm) the longer the length, the higher the magnification.


In use,
these tubes expose a whole new world of wonder. In the lead photo at the top, for example, a simple chrome handle becomes something magical, reflecting the entire room. If you look closely, you can see the blades of lens's aperture showing that it was stopped way down to get the maximum depth of field.

So consider
getting a reversing ring or an extension tube to get a new perspective on everyday objects. You'll be glad you did!

Further Reading:

Flickr Group "Closer and Closer"

Reversing Rings


Extension Tubes


Thursday, November 5, 2009

Frames Within Frames


As a photographer,
I've learned a great deal about composition. Making an image that captures the viewers interest is something we all strive for in this crowded world. Its a way we can stand out among thousands of others.


One of the ways
to compose an interesting image is to look for frames within frames. Our eyes are naturally drawn into the frame. Is it because we humans are natural-born explorers? Perhaps its because there is symmetry: the photo frame mimicks the subject frame.


Whatever it is,
composing an image like this is pretty easy to do and the results can make your image really pop. The next time your out with your camera, look for ways to frame your shot within a frame; you'll be surprised at how it turns out!

Monday, October 12, 2009

Eliminating Distractions

One of the most important aspects of good composition is how the subject relates to the background. This can be important in conveying a feeling.


In this picture
we see two snow egrets flying low across the glassy water. The background is completely void of any distractions. Your eye is drawn to the subject and then down to the reflection. If I did my job right, you feel the serenity and quietness of the scene. Maybe you even feel a bit lonely.

Half the battle of being a photographer is knowing how to post process the image. This can be as simple as fixing a blemish on an otherwise perfect portrait, dodging (lightening) the subject to draw attention, or as drastic as compositing (combining multiple images) to create a something that never actually happened. It all depends on what you, the artist, are trying to convey.

If your goal is
to be as realistic as possible, as in photojournalism, then post processing has to be light. Maybe only adjusting the contrast, reducing the digital noise, or tweaking the brightness is all that's allowed.

For this image, I cropped vertical, and used Photoshop to clone out the background leaving only the two birds. The original image below shows quite a different scene. Shot by the side of the busy road, these two birds were not alone at all.

When I first looked at the image, I almost threw it out. There was so much going on, and my low ISO/slow shutter speed made for some motion blur. But, in post, I was able to clean it up quite a bit.

We, as photographers,
should always try to get it right in the camera, but sometimes things happen way too fast for us to think. These "grab shots" don't often turn out well, but, before you press that "delete button", ask yourself, could I fix this in Photoshop? Many times the answer is Yes!

Tuesday, October 6, 2009

Contests and Critiques


Sometimes
I look at a published photo and say to myself: "I could shoot that!" We have all said that from time to time, but could you really? How do you know how your work would stack up?

There are two ways that I know of to find out: Contests and Critiques

Entering photo contests can be a bit scary, but rewarding if you can keep at it. The other day I was talking to one of my photographer friends who'd won a photography contest for his school. He was excited at receiving the notoriety and earning the respect of others. We are all a bit insecure on the inside, especially as artists, so winning a contest is like a validation.

As we spoke,
I remembered a contest I'd won back when digital images were far less known. In 2000, our local paper, the San Jose Mercury News was running a digital photo contest.

Entrants were asked to email their best shot to be judged among others. I'd taken this photo four years prior on a Winter's day with my SLR and Kodak ASA 200 film. I have to credit my wife, Lilia, for suggesting the shot after my daughter fell asleep on the baby scale. The image came out a little too blue for my taste; the kitchen skylight was the culprit, so I scanned the print and adjusted the color balance to warm things up a bit.


I remember finding out that I'd won a week or so before the story ran. One of the editors requested the file in TIFF format for printing. The image barely fit on a floppy disk.

The day the paper came out was pretty cool. Phone calls from local family members and a few kind-hearted strangers made that day very special to me. I was published!


Another way is through critiques.
Its so easy for us to share our images these days. Sites like Flickr and Picassa make it simple to expose your art to the public eye. Anyone can comment on your image, but if you are trying to improve, these comments are generally only positive.

What's missing is the critique. There are groups within Flickr that will provide feedback on your images; Try searching for "critique" and join. Keep in mind that you'll get many differing opinions and be ready to get slammed once in a while. Remember, what doesn't kill you makes you stronger!

So enter a contest the next time you see one. Be wary of those with an entry fee. (See the link below for further reading.) Join Flickr and then a "critique" group. Remember only upload your best work, and don't be afraid of the negative comments Each one adds a little clarity to your vision!

Further reading:

Scott Bourne's take on contest legitimacy.
Flicker critique groups


Monday, September 28, 2009

Exchanging Camera Gear


Back in February,
I purchased a 50 mm f/1.4D Nikorr lens from a local camera shop. Several months later, I noticed a small chip in the middle of the glass behind the rear element. I need the lens as it's my main indoor glass, but know that the store has a 30-day exchange policy. I was able to get a new lens exchange the next day. Here's 9 steps to consider if you need to do the same:

  1. Try to arrive on a weekday, before the lunchtime rush. This way, If negotiations don’t go so well, you’ll have an audience that may play in your favor in case you have to raise your voice.
  2. Be courteous and understanding. Listen to the policy and ask clarifying questions so that they know they’ve been heard.
  3. Follow the procedures. If they want you to talk to a repair person, do so, but don’t loose sight of your goal.
  4. Ask for a manager. Many times, associate level employees have no power to bend the rules.
  5. Point out that you are a "good customer" and you want to “remain a good customer”. You also want to “continue to support local businesses”
  6. Ask the all important question: “Under what circumstances could the product be exchanged” This gets them to think of creative ways of helping you out.
  7. Point out that you were “sold a defective product” and that the store has been “enjoying your money” since the purchase date. Pause, don't speak. Let the pressure build.
  8. Be flexible. Understand that they still may not be able to grant you a replacement, but ask for a loaner while yours is being repaired.
  9. Be appreciative of their time and effort. If things play out to your advantage, buy something to show that you were serious about point #5 above.
I hope these are helpful suggestions for you. Please comment and add to the list If you have experience with other tips.


Tuesday, September 22, 2009

Strong Lines


When you look at a photograph, what makes it special to you? Have you ever stopped to figure out why the image is pleasing?

One element
of composition that works well in photographs is strong lines. We humans like to see things in straight lines. Our eyes naturally follow those lines and take our minds along with them. We take a little trip to see where the lines end up. If there's something of interest at the end of those lines, we get a little reward for our journey.

In the photo above,
the wooded fence, with its pattern of dark and light, work well to create strong lines. The small easel at the end of the pathway is bathed in bright light, which illustrates the point.

Lines can come from your subject as well. A well placed arm extending toward the camera lens will naturally take the viewer right to her face. With proper lighting (e.g. off camera flash) the composition will pop.

The next time
you are out and about, try looking for strong lines. Arms, legs, fences, and pathways all can work toward building a well composed image. Try placing your subject as a reward where the lines converge for an added bonus.

Give it a try, Pixels are free!

Thursday, September 17, 2009

Where are you going with all of this?


Lately I've been pushing really hard to try and carve out a name for myself as a Photographer. I see the amazing work done by others in the field and aspire to be that good. I'm finding that it doesn't come easy.

I've racked
over 10,000 images in less than 9 months on my Nikon D90. I listen to podcasts, attend workshops, blog, and tweet. I have so far to go, and there are so many directions to turn. Its like Ive been driving in a hurry down a dark road and have no idea where I'm going. Some days, I think I know; Others, I have no idea....

A while ago I'd gotten in over my head. I had just finished a location shoot and an outdoor model shoot and spent way too many hours in Photoshop, neglecting my family. I was tired and excited all the same. My wife stopped me and asked a question that made me slam on the brakes hard:

"Where are you going with all of this?"


The question
took a few days to sink in. I felt the blackness of self doubt creeping up from below. Where am I going? Is this a phase? What do I want? Who do I want to be? Why?

I looked at the garage,
I have light stands, diffusers, reflectors, gaff tape on the floor. Hell, I even have a 9 foot long roll of white paper. Where am I going with all of this?


I look at the images
I've uploaded on iStock and Shutterstock. To date I've made $15.57. I had dreams of making enough to buy a new lens; to have a hobby that pays for itself. Wouldn't that be cool? New lens, new camera body, maybe even a Mac some day! But $15.57? Sheesh!??!!

I exchanged emails
with a Photographer who makes a living selling microstock images. She was very gracious in telling me that very few make what I make at my "day job". Photography is hard work, it would take years to reach that level because of the competition, and I'm kinda used to living in a nice neighborhood in the Bay Area. The voice inside of me whispers:

"Don't quit your day job"...


So this entry
is about readjustment. Its about a realization that its a hobby for me, not a vocation. Reflecting on what makes me happy leads me back home, to my lovely wife and great kids. I won't quit my day job. I like what I do!


I like taking pictures too. I like watching people when they see an image that touches them. I feel great inside. I'm slowly earning respect and admiration. I also like the way that the camera brings me closer to people; the way an image can make a friend.

For now,
I'm at peace with myself. I've realized that I'll never be the next McNally, DuChemin or even Arias. I'll never make a million selling my images, but....

I enjoy the learning! I know how to take a good picture now, how to compose, how an f/stop can say so much. I know how to approach a stranger for a photo, I know how to sell a microstock license, hell, I might even see one of my pictures in print someday.

I'll keep shooting. I'll keep pushing and driving. I still have no idea where I'm going, but...

I'll slow down and enjoy the journey and keep my family in focus too!


Smile!

Friday, September 4, 2009

Timing


Patience and timing
are important elements in photography. My drive home from work usually takes me past rolling hills in the afternoon sun. One day, in early summer, I took a detour mainly to look for a nice sweeping vista to photograph. As I crested the hill, I saw this small neighborhood grape vineyard covered by bird netting. The glimmering leaves on the vines caught my eye so I slowed down and parked.

I scouted out the vines to see if there was a shot or two I could compose. There was this little pocket where the light was just right. Framed by branches and spiderwebs these lovely globes of light seemed to call to me.

I walked back
to my car to get the camera and made a few images. I was surprised that the bird netting wasn't all that detrimental to the shot. There is something to be said for having good glass in your lens. One thing to keep in mind is that sunlight changes quickly near the end of the day. If you take too long, you may end up with a nasty shadow in the way. Work fast!

Back at home, I spent some time in Photoshop cleaning up the image, removing some of the distracting elements. The "healing tool" works wonders for spiderwebs! I dodged (brightened) the center of the grapes to add interest; The eye is always drawn to the brightest thing in the frame.

Given that
it was early spring, these grapes are young and green. I was happy with the image, but wondered what it would be like as they ripened. I stopped by several times throughout the summer to have a look at how they were progressing.

In late August,
the time had come. Some of the bunches had already begun to turn to raisins. Harvest time was near. In this shot the grapes are translucent and glow yellow as they bask in the afternoon sun. This one makes my mouth water!

I'll close this entry by asking you to look around; Try a different road. See what you can see at that time, but imagine how things would change at different times of day, or at different time of the year. You'll often be surprised at what you find!


Friday, August 28, 2009

Help-Portrait

An awesome idea to help connect with people in need

Are you in?

Follow the link if you want to help....

http://www.help-portrait.com/

Monday, August 24, 2009

The Lemonade Stand


One hot day...
I was driving down a residential street on my way home from the gym. The weather was clear with temps in the low 90's.

As I rounded the corner, I saw a bright pink sign with a little girl shouting to "Lemonade!" to passers by. Something told me to slow down. I was thirsty, after all, and the thought of a lemonade sounded good.

I parked
and saw these four kids, two girls and two boys, happy and smiling; I could sense their excitement: "They had a customer! And he's reaching for his wallet!"

Their stand consisted of a folding table and a few garden chairs nestled beneath the shade of a blue patio umbrella. Not far from them sat a few of the parents in conversation, enjoying the warm day.

I asked
the young entrepreneurs what the would do with "all the money they were making today". "We're gonna split it!" they responded. I paid for my Dixie cup full of the cold sweet concoction and left them a generous tip.

The thought occurred to me to ask for a photograph, I'm not sure why, I never am... So I introduced myself to the parents and asked casually. Being a parent myself, I completely understand any hesitation to grant such a request. The world is just a different place than it was when I was growing up. Luckily, I got the approval and walked back to my car to get my camera.

I shoot with a Nikon D90 SLR with a 50mm f/1.4, which isn't all that big of a camera, but still can be a bit intimidating. Its not the average point-and-shoot, so it took a while before the kids started to loosen up.

In this shot
...you can see the differences among them; One is smiling brightly, while another is almost hiding under the table. I really enjoy the way that the camera is able to stop time. To freeze that moment with the push of a button.

I feel like I've made some new friends that day. Since then, I've sent the retouched images to their parents, and every time I drive by, I'll look for the Lemonade Stand and the young entrepreneurs that brought it to life on that hot day.... and I'll smile!


Tuesday, August 18, 2009

Fire Station Photo Shoot


On Saturday, July 25th, I had the honor of being allowed to photograph inside of a local fire station. It took some time to get permission, but once I finally reached the right person, things seem to move along swiftly.


My motivation
for this self-assignment was to show the viewers a glimpse of what life is like for these brave men who risk their lives to protect us. Most of us only see these guys when its an emergency, and by then, its too late to exchange the pleasantries of introduction.


I wasn't sure what to expect
when I arrived. I had most of my lighting gear packed into the back of my little hatchback. As it turned out, I only needed one light stand some gels and two CLS speedlights.
I was greeted at the door by the three-man crew and felt immediately at home. These guys went out of their way to help me create these images. I showed them the sketches of what I was trying to capture and they were more than willing to help.


In this shot, the Captain holds up an adapter for framing. He's lit from a straight speedlight at camera right (set to TTL). I like the hard light and the way it adds drama to this shot. His blue eyes add so much to this capture.


I asked this man
if he could tell me a story about when he felt fear in the course of his duty. He recounted a time when he was at an apartment fire with his partner. The floor was getting soft and some spots had already burned through. His partner was advancing and he was close behind. The call came in for them fall back because it was getting too dangerous, but his partner wanted to press on and try to put it out. He had to coax his partner out just before the place collapsed. "Most fire fighters that die in structure fires are killed by falling though something, or from having something fall on them"


This fire engine
is basically a pump on wheels and a very large tool box. The pump is capable of 1500 gallons per minute. That's an entire swimming pool every 9 minutes! Each of those aluminum roll up doors houses a compartment with hose adapters, hydrant wrenches, tools for getting access into burning building quickly, and paramedic gear for keeping victims alive until the ambulance arrives.
Inside there are 6 seats. Where the men sit, is at the discretion of the captain. Near each seat it each man's own custom designed jacket and pants (or "turn-outs" as they're called because of the way they are stored) The men get dressed en-route to save time. Everything they need in in the engine so they don't forget anything.

All in all it was a great experience to meet these modern-day heroes. I have the ultimate respect for these guys and the difficult job they do so well.

Sunday, August 16, 2009

A Week Off!


I spent a wonderful week off
on Oahu with my family and am still basking in the "tropical glow" of maitais, sun, sand, and the pleasant natives we met along the way. I brought along my camera most days and captured as much of the experience as I could.


On one rainy
day, I traveled to the northern part of the island to an enchanted place called Waimea Valley (on Oahu, not to be confused with Waimea Canyon, on Kauai). Here there is a botanical garden sheltered by high cliff walls. The feeling in primeval with strange plants and flowers adorned with small droplets.


The light rain kept most of the other tourists away making this an experience that was very personal and profound. The garden path beckoned us to move onward up hill to the falls, strongly flowing. There will be no swimming today.


On the way down,
we were greeted by a pleasant native woman who offered to teach us how to make a small fish form the leaves of a coconut tree. My wife and I followed her careful instructions and were pleasantly surprised at how well our fish turned out.


The valley will remain one of the outstanding memories for us. the peaceful and serene surroundings along with the gentle rain and bright native smiles will be some of our fond memories from this trip.

Wednesday, August 5, 2009

Opportunity


I drive by
this place on my way home from work each day and love how the afternoon sun plays on the sides of these train cars. They've been there for months and I've had my camera with me but had never made the image, until today.

There is a point
along the road where you cant turn back, without a lot of hassle that is. I see the ore cars but by the time I think of making the shot, I've already past that point, so I drive on. But today was different.

I parked as close as I could which still meant a long walk in the coarse gravel alongside the tracks. Camera on my shoulder, risking the puzzled looks from passers by, some of them co-workers, no doubt, I walked in the dust. I am a photographer.

As I neared
the ore cars, their sheer size was daunting. The factory was closed for the day, the workers had all gone home, but still I obeyed the "No Trespassing" signs because I have yet to see the inside of a police car.

I started shooting. It was really windy and I had to brace myself against the train to steady the shot. I stood, I crouched, I knelt, I zoomed, framed and composed, and I shot. Twenty five images captured and I chose this one to share.

I love the way the cars arc off into the distance. The dirt road and tire tracks strengthen the lines in this image. The silo in the distance give your eye a destination.

Some one once told me
that all the anticipation an nervousness you feel before a shoot goes away the moment you take the first picture. This time I felt it. It was nice being present, tuning out all else, and just making images.

Many times in life, routine keeps us from opportunity. We get so used to doing the same things over and over again and don't bother with that which removes us from our comfort zone. When we take the time to stop it can be quite rewarding. We have an image, and a story to tell. To quote David duChemin: "Carry your camera and don't bemoan missed opportunities. Just chase new ones"

Sunday, August 2, 2009

Street Shooting


Street shooting refers to one of the most challenging types of photography I've dealt with. It involves placing yourself and your camera in a public place and then...gasp...trying to get a stranger to pose for a portrait.

This Weekend...
my assignment involved shooting at a popular shopping mall with a 50mm lens. This meant that I needed to get in close to people, so I'd definitely have to build rapport. I saw several interesting subjects walking around the indoor mall. I finally gathered up enough courage to ask: "Would you mind If I shot a photo?" My first few attempts went fairly well. I was able to take photos of a small dog, and a toddler. I snapped a couple of quick shots and thanked them for their time. Still, this didn't feel like I pushed myself far enough.


Women and Children
The most difficulty came with asking mothers if I could take photos of their children. Twice, I was promptly rebuffed in the way a mother bear protects it cubs. I apologized for the intrusions and scampered away with my tail between my legs. I felt a little ashamed of my self; I'm not sure why....

Then I met Roy
I noticed this guy hair. Its not something that you see very often, so I was intrigued. I walked by once, but didn't ask. I was still a bit shy from my last rejections. Still something inside told me to try again. I thought his hair looked really cool and I told him so. He said he'd had it cut in Vancouver where he's from. I asked him if he wouldn't mind as I pointed to my small camera bag and he said:"Sure! Go for it!"

He didn't seem to mind as I made a few images. Actually I think he enjoyed the impromptu attention. I handed him a card with my Flickr account, this blog, and my email address. He smiled and said He'd look it up when he got back. Roy's a nice guy!


I truly admire
those photographers like David DuChemin, who grapple with language and cultural barriers to produce some of the world's most stunning street portraits in far off lands. Having put myself through this exercise, I now realize how far I have to go!

Friday, July 24, 2009

Why Photography?

A Realization:
This weekend, during the Scott Kelby Worldwide Photo Walk, I had some interesting conversations with other photographers. One in particular was with Frederick Van Johnson. As we walked down the shaded street I asked him a simple question, but his answer was quite compelling. The question was: “Why do you like photography?” His answer came quickly; I’m quite sure he’d been asked this question many times before. His answer was:

"To be a good photographer I think you have to have some mastery over at least these three things: 1) An Artist - you have to know and understand the concepts of photography. 2) A Psychologist - when shooting (photographing) people, one has to have the ability to connect, build trust, and relax the subject in order to show them at their best. And 3) A Geek - You just HAVE to love computers, and gadgets to be in this field. Things change so quickly, if you didn't lust for the next "shiny object", then it would quickly become tiresome."

Making connections:
What resonated with me was the part about making the connection with people. I think the camera is a tool we use to get closer to each other. I'm often amazed at the places I've been able into get to just by asking if I can take a picture. People seem genuinely willing to show me around, to share a little bit of their world with me. I often feel their pride as I listen to their story. Perhaps they use my camera as a tool to connect with me as well. Perhaps they appreciate being noticed. Perhaps we all just want to be recognized, to be liked, and to belong!


Tuesday, July 14, 2009

iStock Update


So when do the gold coins start falling from the sky?

I think we all tend to believe that selling your photos online will be easy. We think that once we post, the gold coins will start falling from the sky.

Last week, iStock accepted my application and I began uploading photos to their site.
Oh by the way, they limit me to 15 images a week. The upload process is not quite as easy as Flickr, there are no automated tools for Windows users, yet, so the files must go one by one. For each file, I filled in key words relevant to the image, categorized it and clicked the submit button. Ah yes, now I just sit back, rub my hands together and wait for the mail man.

So where's my check?

Immediately after upload, I checked the database to find the files, to see the result of my half-year-long pursuit. Wha,,, where are they? What does "Pending" mean? I checked the next day, and the next with still no results. Okay, I'm not excited anymore... I asked another photographer, Nicole Young, what to expect.

The Scouts

iStock uses a team of inspectors called Scouts who evaluate each image for composition, lighting, shadows, sharpness and a bunch of other things. Apparently the process takes 5 to 8 days. When they did get to my files, they sent me emails along the way. I got either:

Hello timlimon,

Your file "School Buses" has been accepted into to the iStockphoto collection.

Thank you for submitting your art to iStockphoto. You can view your file here:

http://www.istockphoto.com/file_closeup.php?id=9912743


or

Dear timlimon,

We regret to inform you that we cannot accept your submission, entitled Apple for the teacher ( http://www2.istockphoto.com/file_thumbview_approve/9915834/2/istockphoto_9915834-apple-for-the-teacher.jpg) for addition to the iStockphoto library for the following reasons:

We could not find a clear center focal point for this file.

For more information about iStock Focus Standards, please see:
http://www.istockphoto.com/tutorial_2.1_focus.php

:( :)

Its funny, but rejection spurs me onward. I get a little fire under my butt to go out and make a better image. I looked at each rejection and agreed with the inspector. This one is a tiny bit blurry (if I zoom waaay in), this one has dark shadows etc... Hey I'm getting free photo critique, cool!

So a week has gone by and here's my stats: 15 submissions, 6 accepts, 6 rejects, 3 still pending. I must say the rejections have got me to up my game considerably. Now I check the lighting very carefully, I look at the sharpness while zoomed waaaay in, I spend a lot more time planning, and thinking and evaluating each exposure, cause after all, we all hate rejection, right?


Monday, July 13, 2009

Inspiration


This Sunday,

I listened to an excellent interview with Anne Day. Anne is a world renowned photographer who spoke about photographing in your own home. You know when the light is right, When the color is golden and when the shadows fall just so. Her boys were being... well... boys and running around indoors. She snapped the picture at just the right moment and froze that instant to share with the world. Being a father, some of her images struck me. I felt my chin begin to quiver.


Photography is an art. Its as if we are all walking around in a painting that changes as we move through it. The light in the morning is colder, bluer and the evening is warmer, and more golden. the shadows play with the wind. All we need to do is frame it and release the shutter to capture that fleeting moment in time.


Friday, July 10, 2009

Happy Friday

This week's post is brought to you by a couple of talented students at Kingston University. Enjoy!

HP - invent from Tom and Matt on Vimeo.

Thursday, July 9, 2009

The Bus Yard


When was the last time you stood next to a school bus?

On certain weekdays in the summer I drop my kids off at a day camp. Right across the street is the county’s transit yard. I've driven by this yard many times. This particular time, I had my DSLR with me. I stood outside the fence and shot a few pictures, but it felt funny. I didn’t have permission and there was a big "No Trespassing" sign posted. Still I felt compelled to get in closer. After quite a bit of mental deliberation, I decided to go around and see if there was someone in the office I could talk to.

Two Ladies
There were two nice ladies there who referred me to their supervisor. After a few questions, he agreed and let me walk around and take some shots. Being the Friday afternoon before the 4th of July, the place was pretty empty.

Shiny and Clean!
Many of these busses were recently detailed. One in particular, Number 9, caught my eye. All of the rivets stood out and the clean black lines made for some interesting photos. Since it was midday, the side lighting was sparse and I had to rely on the reflected light from the adjacent bus.

Nice People
I spent about 40 minutes walking around, kneeling, checking exposure and sharpness of each capture. As I left, I passed back by the office where those two nice ladies took a genuine interest in what I was doing. “Will you post them?” “Where can I see them?” and “Do you have a card?” We talked for a while then I said “Goodbye and Thank You!”

Returning the kindness…
A few days later, I returned and dropped off a few 8x10 prints of the best 3 shots along with a business card. Neither of the two ladies was there at the time, so I handed the envelope to someone else and then disappeared around the corner to look at one of the workers in the wash bay.

Linda…
I wasn’t there two minutes, when someone approached me and said “You took a wonderful picture of my bus! Its Number 9 and my name is Linda”. Speaking with her for a while, I could sense the pride she had in what she does and how important it is. She pointed out how there are steel reinforcements that form a cage to protect the children in the event of a crash. Linda has been responsible for the safety of thousands of children, moving them from point A to point B, day after day, with out incident. She should feel proud!

Tuesday, July 7, 2009

Accepted!

This morning I received some excellent news from the folks at iStock photo:

Dear Timothy (timlimon),
Welcome to iStockphoto.com, the
designer's dirty little secret. Congratulations, the iStockphoto administrators
have determined that your files are commercially and technically ready for
iStockphoto.com. Please begin uploading at your convenience. ....

WhooooHoooo!
As many of you know, I have been trying for many months now to make images worthy enough to be used as stock photos. This post was one of many rejections received. Stock photos are those that you see on websites, billboards, or the side of a bus. You know, like this:


So What...
...does this mean? Well it meant that I can start selling images and, hopefully, make a little money too. It also means that I have a small chance at seeing one of my shots on a billboard someday. I have to temper the excitement with a dose of reality; There are many, many photographers contributing to iStock, so the chances are still slim, but at least I've cleared the first hurdle.

I'm happy with that!

Sunday, July 5, 2009

What's A Clamshell?

Recently,
I was fortunate enough to purchase a Nikon SB900 Speedlight (a camera flash). I have been eyeing this one for several months now and finally got up enough nerve to make the purchase. Joe McNallys book, "The Hot Shoe Diaries" has been instrumental helping my understanding.

One of the reasons that this flash is so useful is that it works using the Nikon Creative Lighting System (CLS). This system en
ables the flash and the camera to "have a conversation" about how much light should be used to properly expose the subject. The Canon equivalent is "eTTL" which does pretty much the same thing. The amazing thing about both of these systems is that this conversation happens in a few milliseconds and yields some pretty impressive results!


In this shot...
The Nikon D90 camera acted as the master unit, controlling the output of the new SB900 (camera left at 7 feet high and aiming downward) and the SB600 (camera left at 2 feet high and aiming upward). Each flash was softened using a translucent "shoot through" umbrella. I used a white bounce card (camera right) to light her left side. The background was illuminated using my old Vivitar flash with the hot shoe slave. Because the studio is shallow, I had a tough time getting the background lit evenly. Here is the set up shot for reference:


Because ...
The umbrellas are facing one another, the setup is referred to as a "clam shell". One nice thing about this type of a set up is that both flashes are on one lightstand making it very easy to adjust. The lower flash is held in place on the stand using a Justin clamp.

As you may have noticed by now, I tend to gravitate toward inexpensive (don't say cheap...) studio equipment. One reason for this is that I see the real value in the high tech electronics (flashes, camera bodies, slaves and the like). A simple satin umbrella, or tubular steel lightstand is relatively low-tech and should be priced accordingly.

One thing

That I notice now, is that I tend to look at magazines, websites, and billboards differently. I'm looking for how the lighting was done. And now I'm starting to understand!

Tuesday, June 30, 2009

Get Up and Shoot Down


Would you like to add some interest to your shots?
One sure way to do this is to change your point of view. As humans we are used to seeing the world from our own two eyes. Whether standing or sitting, we generally look forward and outward making pictures from this vantage a bit on the ordinary side. Try getting up high and looking downward at your subject. This technique can be especially flattering in portraiture.

Try This:
Look at yourself in the mirror and tilt your head down. Notice how the skin on your jaw broadens? Now tilt your head up and watch as the skin on the lower part of your face gets narrow and tightened.

In Practice...
Look for opportunities to photograph your subject from above. When they are seated, stand. When they are standing, get up on a step stool and shoot downward. Try shooting so that the subjects shoulders are at an angle to the camera to add a bit of warmth to the shot.

Monday, June 22, 2009

"Real" Darkroom Photography (Part One)

When I was a kid, I used to watch a TV show called Mission Impossible. Inevitably, one of the main characters would spend time in the darkroom developing film to incriminate the criminal-du-jour. Have you ever wondered how that process works? Well, in this first segment, I'll explain how a latent image is captured on film and how the developing process works.


Many years ago, I was fortunate enough to have a class in darkroom photography when I was in school. After that, I set up my own darkroom in a spare room that used to be the garage. The process was so fascinating to me. Now, in the age of digital cameras, that knowledge is getting a bit scarce.

There's Jello inside?
Inside the metal canister is a roll of plastic which is coated with various layers. One of these layers is a special form of gelatin (the exact same chemical you can eat at desert!) Suspended in this dry gelatin are microscopic with silver-halide crystals. These crystals act as light detectors and change chemically when hit by photons. Areas of the film that were hit by bright light will contain large numbers of activated silver halide coating. Other areas which have not been exposed to bright light will not contain many activated crystals. Its important to note that the film contains only a latent image at this point. That is to say that the activated areas look exactly the same as the un-activated areas but their chemically different. The silver-halide crystals are amazingly stable and can hold their state (activated or not) for a long time. To render the image, we need the next step.

The Developer
The developer is a fluid that replaces the exposed silver halide crystals with pure silver. This chemical reaction takes place in a light-tight canister in which the film has been placed on a spiral spool. The spool is needed to keep the film surfaces separated to the developing agent can do its work. The film sits in the tank for about 12 minutes depending on the temperature. The higher the amount of activated crystals, the more silver you get in that spot, and the darker the spot will appear in the end.

Whoa! Stop
If left in the developer for too long, the remaining unexposed silver-halide crystals would start to be affected. To prevent this you add something called the "Stop Bath". This chemical would stop the developing process before it began to eat up the rest of the latent image on the film. 30 seconds is all the time it takes for the stop bath to do its job.

The Fixer:
In order to make the image light durable, we need to remove the unexposed crystals using something called fixer. Generally this liquid dissolves away those crystals that have not become silver metal so that subsequent exposure to light doesn't activate them. The film soaks in the fixer for about 3 minutes. Now the image can be viewed. The image on film will appear as a negative of the image that was shot because bright spots = lots of exposed crystals = lots of silver = a dark area on the developed film.


Sticky Stuff
Remember that the film has coating of gelatin on it? This stuff is pretty sticky when it's wet and needs to be dried thoroughly before it can be handled. I used to have a clothes line strung out with a clothes pin on the top and bottom to keep the film from curling back up. Once dry, the film can be handled, but can still be scratched fairly easily.

There's some great further reading from Illford on the whole process


That's it for now. In the next segment we'll take a look at how the negative gets printed.