Showing posts with label photography. Show all posts

Tuesday, September 22, 2009

Strong Lines


When you look at a photograph, what makes it special to you? Have you ever stopped to figure out why the image is pleasing?

One element
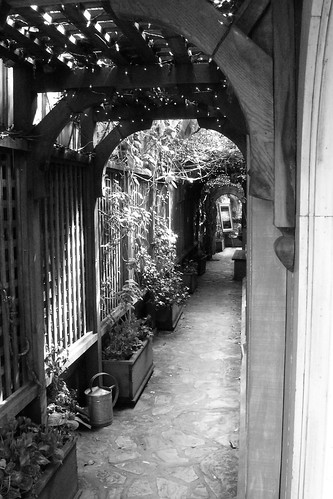
of composition that works well in photographs is strong lines. We humans like to see things in straight lines. Our eyes naturally follow those lines and take our minds along with them. We take a little trip to see where the lines end up. If there's something of interest at the end of those lines, we get a little reward for our journey.

In the photo above,
the wooded fence, with its pattern of dark and light, work well to create strong lines. The small easel at the end of the pathway is bathed in bright light, which illustrates the point.

Lines can come from your subject as well. A well placed arm extending toward the camera lens will naturally take the viewer right to her face. With proper lighting (e.g. off camera flash) the composition will pop.

The next time
you are out and about, try looking for strong lines. Arms, legs, fences, and pathways all can work toward building a well composed image. Try placing your subject as a reward where the lines converge for an added bonus.

Give it a try, Pixels are free!

Tuesday, August 18, 2009

Fire Station Photo Shoot


On Saturday, July 25th, I had the honor of being allowed to photograph inside of a local fire station. It took some time to get permission, but once I finally reached the right person, things seem to move along swiftly.


My motivation
for this self-assignment was to show the viewers a glimpse of what life is like for these brave men who risk their lives to protect us. Most of us only see these guys when its an emergency, and by then, its too late to exchange the pleasantries of introduction.


I wasn't sure what to expect
when I arrived. I had most of my lighting gear packed into the back of my little hatchback. As it turned out, I only needed one light stand some gels and two CLS speedlights.
I was greeted at the door by the three-man crew and felt immediately at home. These guys went out of their way to help me create these images. I showed them the sketches of what I was trying to capture and they were more than willing to help.


In this shot, the Captain holds up an adapter for framing. He's lit from a straight speedlight at camera right (set to TTL). I like the hard light and the way it adds drama to this shot. His blue eyes add so much to this capture.


I asked this man
if he could tell me a story about when he felt fear in the course of his duty. He recounted a time when he was at an apartment fire with his partner. The floor was getting soft and some spots had already burned through. His partner was advancing and he was close behind. The call came in for them fall back because it was getting too dangerous, but his partner wanted to press on and try to put it out. He had to coax his partner out just before the place collapsed. "Most fire fighters that die in structure fires are killed by falling though something, or from having something fall on them"


This fire engine
is basically a pump on wheels and a very large tool box. The pump is capable of 1500 gallons per minute. That's an entire swimming pool every 9 minutes! Each of those aluminum roll up doors houses a compartment with hose adapters, hydrant wrenches, tools for getting access into burning building quickly, and paramedic gear for keeping victims alive until the ambulance arrives.
Inside there are 6 seats. Where the men sit, is at the discretion of the captain. Near each seat it each man's own custom designed jacket and pants (or "turn-outs" as they're called because of the way they are stored) The men get dressed en-route to save time. Everything they need in in the engine so they don't forget anything.

All in all it was a great experience to meet these modern-day heroes. I have the ultimate respect for these guys and the difficult job they do so well.

Friday, July 24, 2009

Why Photography?

A Realization:
This weekend, during the Scott Kelby Worldwide Photo Walk, I had some interesting conversations with other photographers. One in particular was with Frederick Van Johnson. As we walked down the shaded street I asked him a simple question, but his answer was quite compelling. The question was: “Why do you like photography?” His answer came quickly; I’m quite sure he’d been asked this question many times before. His answer was:

"To be a good photographer I think you have to have some mastery over at least these three things: 1) An Artist - you have to know and understand the concepts of photography. 2) A Psychologist - when shooting (photographing) people, one has to have the ability to connect, build trust, and relax the subject in order to show them at their best. And 3) A Geek - You just HAVE to love computers, and gadgets to be in this field. Things change so quickly, if you didn't lust for the next "shiny object", then it would quickly become tiresome."

Making connections:
What resonated with me was the part about making the connection with people. I think the camera is a tool we use to get closer to each other. I'm often amazed at the places I've been able into get to just by asking if I can take a picture. People seem genuinely willing to show me around, to share a little bit of their world with me. I often feel their pride as I listen to their story. Perhaps they use my camera as a tool to connect with me as well. Perhaps they appreciate being noticed. Perhaps we all just want to be recognized, to be liked, and to belong!


Monday, July 13, 2009

Inspiration


This Sunday,

I listened to an excellent interview with Anne Day. Anne is a world renowned photographer who spoke about photographing in your own home. You know when the light is right, When the color is golden and when the shadows fall just so. Her boys were being... well... boys and running around indoors. She snapped the picture at just the right moment and froze that instant to share with the world. Being a father, some of her images struck me. I felt my chin begin to quiver.


Photography is an art. Its as if we are all walking around in a painting that changes as we move through it. The light in the morning is colder, bluer and the evening is warmer, and more golden. the shadows play with the wind. All we need to do is frame it and release the shutter to capture that fleeting moment in time.


Tuesday, July 7, 2009

Accepted!

This morning I received some excellent news from the folks at iStock photo:

Dear Timothy (timlimon),
Welcome to iStockphoto.com, the
designer's dirty little secret. Congratulations, the iStockphoto administrators
have determined that your files are commercially and technically ready for
iStockphoto.com. Please begin uploading at your convenience. ....

WhooooHoooo!
As many of you know, I have been trying for many months now to make images worthy enough to be used as stock photos. This post was one of many rejections received. Stock photos are those that you see on websites, billboards, or the side of a bus. You know, like this:


So What...
...does this mean? Well it meant that I can start selling images and, hopefully, make a little money too. It also means that I have a small chance at seeing one of my shots on a billboard someday. I have to temper the excitement with a dose of reality; There are many, many photographers contributing to iStock, so the chances are still slim, but at least I've cleared the first hurdle.

I'm happy with that!

Tuesday, June 30, 2009

Get Up and Shoot Down


Would you like to add some interest to your shots?
One sure way to do this is to change your point of view. As humans we are used to seeing the world from our own two eyes. Whether standing or sitting, we generally look forward and outward making pictures from this vantage a bit on the ordinary side. Try getting up high and looking downward at your subject. This technique can be especially flattering in portraiture.

Try This:
Look at yourself in the mirror and tilt your head down. Notice how the skin on your jaw broadens? Now tilt your head up and watch as the skin on the lower part of your face gets narrow and tightened.

In Practice...
Look for opportunities to photograph your subject from above. When they are seated, stand. When they are standing, get up on a step stool and shoot downward. Try shooting so that the subjects shoulders are at an angle to the camera to add a bit of warmth to the shot.

Thursday, June 11, 2009

I'm International?


I want to say a big "Thank You" to my international visitors. According to the site statistics, I've had some page views from Indonesia, Peru, Cyprus, Spain, Brazil, Italy, Russia, Philippines, Greece, and Canada. I'm surprised at the great diversity. I'll try to keep the interesting photographs coming, because imagery crosses the language barriers.

Thanks Again!

Saturday, May 30, 2009

My Digital Conversion


I used to really be into photography when I was in school. I took a photo 101 class at San Jose State taught by Max Crumley. He's a funny guy who told stories of shooting a locomotive at night by hand firing the flash and "painting" each section of the massive dark beast with his SLR set to the bulb mode. I remember spending hours in the darkroom and coming home smelling like fixer.

My first real camera was a Minolta x700 film SLR. I was fortunate enough to live with a room mate who had most of the darkroom equipment just sitting in boxes in the garage. One day I asked him If I could set it all up. I turned pantry closet into a makeshift dark room complete with Bessler enlarger, safe light, dark bag and a print washer. I took portraits of neighbors and gave them away as gifts. I was having the time of my life!

After graduation, I got married and my Minolta disappeared one day from the trunk of my car. My second camera was a Nikon N8008 complete with a 50mm lens and a Vivitar 3600 TTL flash. Wooo Boy! I was all set!

Funny how free time slips away from you once you get married and have children. Priorities change and you grow in a different direction. I had a friend once, named Ed Jensen, who said: "You never realize how selfish you are until you get married, Then you never realize how selfish you both are, until you have children." He was sure right!

I'd kinda forgotten about photography for about 15 years. Just long enough for digital SLRs to become affordable. Sure I've had a bunch of point-and-shoots over the years, but these were relegated to "happy snaps" for the family and vacations. I'd rarely go out just to shoot pictures.

Now it seems I've rediscovered photography all over again. The kids are old enough to not want their parents around all that much. I seem to have more free time now than I have in years. I've taught myself Photoshop from watching tutorials on YouTube, I joined Flickr and started listening to TWiP. I bought a D90 a month after it came out.

I find myself looking at the world in a whole new way. I started to notice how the light hits things; How different morning is, from evening, I keep saying to myself; "Now that would make a good picture..."

I love learning it all over again. Sure, the basics still apply, "good light" is still "good light", bad light still sucks. I've enrolled in classes and signed up for "photo walks" and bought books. I guess its safe to say "I'm Hooked (again)" But this time its for keeps!

Wednesday, May 27, 2009

Shooting into Darkness


This weekend, we all went to the Academy of Science Museum in San Francisco. It was really crowded, but we all had our expectations set accordingly, so we were ready for it. I brought along the Nikon D90, my SB600, and a snoot in case I needed to throw light at a subject far away.

Controlling the flash off camera
Both Nikon and Canon offer a wireless system whereby the camera body and flash negotiate the amount of light to output while you press the shutter button. The whole conversation takes about 10 milliseconds. In the Nikon World this is called the "CLS" or Creative Lighting System. For Canon, its called the E-TTL system. What these systems do is pretty amazing, allowing you to place the flash many feet away form the camera and really control the direction of the light to add more interest to the Image.

The Albino Alligator
In the main hall there is a pit about 15 feet deep with an albino alligator in the swampy bottom. The pit was fairly dark and the alligator was laying motionless. It made for an interesting challenge to photograph, so I wrapped the snoot around the flash and asked my wife to aim it into the pit. I stood a few feet to her right and zoomed in on the gator. The snoot really helped blast the light down into that dark pit. The result looked pretty cool.

Sunday, May 24, 2009

Shooting Through Glass


Have you ever been disappointed at photos taken through a glass display case? Perhaps you were at a museum or the zoo trying to capture the memory of that animal on the other side. How about shooting through a tour bus window? Was there a lot of distracting glare? Here's a few tricks that photographers use to avoid this situation:

  1. Wear black - Many times the glare comes from what you are wearing. A black jacket or shirt can do a lot to shield stray light.
  2. Shoot off angle - If your using a flash, it will certainly bounce off the glass and ruin the shot. Try moving off axis by 30 degrees or so.
  3. Shoot head on - Crank up the ISO on your camera to use the available light in the display case. Turn off your flash and get as close to the glass as you can. You can even lightly rest the lens on the surface of the glass, provided the optics in your lens don't touch and cause a scratch. The glass will help steady the camera so you don't get any motion blur.
  4. Use your hands - Cup your hand around the lens to block out the stray light. You might even try asking your spouse, child significant other to cup his or her hands around the lens.
  5. Lay something dark on the floor - If the room has a light colored floor causing the glare, lay your dark jacket on the floor to block it out.
  6. Hold smomething dark near the camera - Move the camera out of the way and look at where the reflection is coming from. Use a dark jacket spread over your hand to see if you can get rid of the reflection. Then replace the camera and take your shot
Try these out next time you know that there will be a piece of glass between you and a great photo.

Tuesday, May 19, 2009

Using a "Snoot" for emphasis

What's A Snoot?

Imagine you're taking an indoor picture but want to use lighting draw attention to just the subject. You reach for your flash and attach it to your camera. What do you expect that you'll see?

Probably very even lighting. Manufacturers go to great lengths to balance the spread of the light coming from the flash so that it illuminates the whole frame. Hmmm, That not really what we want in this case, so what do we do?

Enter one of the most elegantly simple device to modify your flash, The "Snoot". Its basically a tube that you place on your flash to focus the beam where you want it. The one I have , by Honlphoto, wraps around your camera flash and attaches with velcro.


This model costs about 30 bucks, has a shiny inside and a flat black outside and is very well made. You could probably make your own for much cheaper, but this one looks like something a professional would use. Below is a test shot I made to illustrate the shape of the light beam as it hits the flat wall. Pretty cool!


Now lets put it to use: In this shot, I'm trying to get the effect of a glow coming from this young boy's new phone. I used the snoot and the off camera flash, handheld by an assistant. The eerie blue glow comes from another off camera flash with a blue filter on it, and bouncing off the cieling. Have a look and tell me what you think?


One thing I'll mention is that the size of the spot is related to the aspect ratio, or the diameter to length ratio. A smaller diameter on a longer length will give you a smaller spot and allow you to keep your distance away from your subject. This is also true for grids or home-made "black straw snoots. More on that later. For now, get out your camera and go take some pictures!


Sunday, May 17, 2009

What's a Grip Head?


This weekend, I stopped by Keeble and Shuchat to look for something that would let me hang the home-made screen flash diffuser. I needed to get the diffuser much closer to the subject and mounting it directly to a light stand wasn't working out well.

At the store, there were several other customers renting studio gear. I have to admit I was kind of intimidated looking at all the stuff there. Being new at this, I had no idea what most of those items were. I ended up buying a "grip head" by Manfrotto, that fits on the top of a light stand and allows a boom (a steel rod) to extend horizontally. The grip head cost about 39.00 USD and is very well made. In this photo, you see a lightstand at the left, with the grip head holding a boom. The skylight panel is attached to the end of the boom close to the model. Notice how even the lighting is on her left side. The flash is softened quite a bit.