skip to main |
skip to sidebar
 "Great images rarely come straight from a great camera."
What you say? How can that be?
Well,
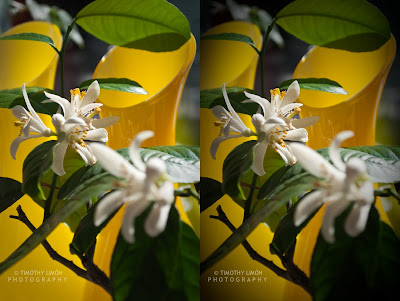
as most photographers will agree, there are certain techniques they've learned over the years to compose, light, frame, and edit that make their shots even better. Using a vignette is one such technique.
A vignette,
as defined by Wikipedia, is a "loss of clarity toward the corners of an image". Looking at the images above, you can see how the one on the right looks darker as you move away from the center. I needed to make the shot a little more interesting and draw the eye toward the center. The yellow vases behind compete with the blossom, so using a vignette is one way to do bring the eye to the subject.
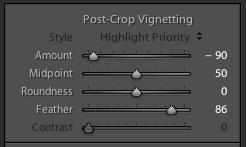
Adobe Lightroom 3
makes this very easy to do; there's a slider for it called "Post-crop vignetting". Move it to the left and the corners go dark, to the right, and they go light. Because it's "post-crop" the image can be cropped in any way before the vignette is applied. Right now the Lightroom 3 beta is a free download and definitely worth checking out.
Adobe Camera Raw
within Photoshop CS4 has the same feature, but since you'll most likely edit the image inside CS4, its tough to go back into Camera Raw and change the slider after editing in Photoshop. A better way is to control it with layer from within CS4. There's a great tutorial listed below.
So, give it a try, but go lightly with it. The images here were overdone for illustration purposes. Subtlety is better for starters.
Enjoy!
Further reading:
Lightroom 3 beta (Mac or Windows)
Photoshop Vignette Tutorial
Flickr Vignetting Group
One of the most important aspects of good composition is how the subject relates to the background. This can be important in conveying a feeling.
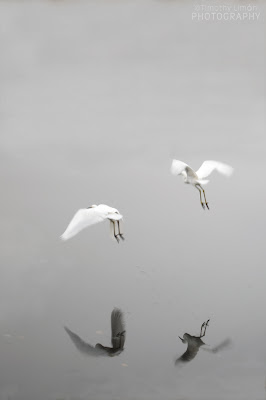 In this picture
we see two snow egrets flying low across the glassy water. The background is completely void of any distractions. Your eye is drawn to the subject and then down to the reflection. If I did my job right, you feel the serenity and quietness of the scene. Maybe you even feel a bit lonely.
Half the battle of being a photographer is knowing how to post process the image. This can be as simple as fixing a blemish on an otherwise perfect portrait, dodging (lightening) the subject to draw attention, or as drastic as compositing (combining multiple images) to create a something that never actually happened. It all depends on what you, the artist, are trying to convey.
If your goal is
to be as realistic as possible, as in photojournalism, then post processing has to be light. Maybe only adjusting the contrast, reducing the digital noise, or tweaking the brightness is all that's allowed.
For this image, I cropped vertical, and used Photoshop to clone out the background leaving only the two birds. The original image below shows quite a different scene. Shot by the side of the busy road, these two birds were not alone at all.
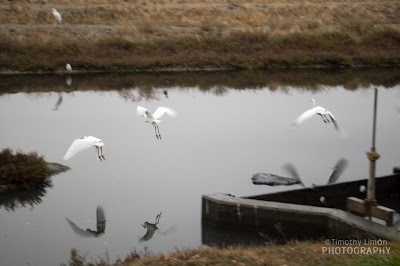 When I first looked at the image, I almost threw it out. There was so much going on, and my low ISO/slow shutter speed made for some motion blur. But, in post, I was able to clean it up quite a bit.
We, as photographers,
should always try to get it right in the camera, but sometimes things happen way too fast for us to think. These "grab shots" don't often turn out well, but, before you press that "delete button", ask yourself, could I fix this in Photoshop? Many times the answer is Yes!


