Tuesday, February 16, 2010

Golden Light


What is "The Golden Hour"?
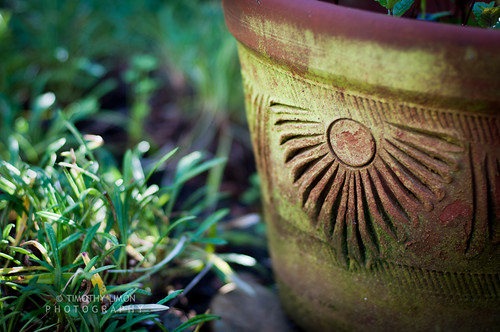
In the early days, I'd often heard of the phrase but wondered what it meant. Basically, the term refers to the time of day when the sun is low in the sky, where the color of light is stained by the atmosphere and the shadows are deep.

Think of it it like this:
Because we live on a spherical planet covered by a thin transparent atmosphere, the sun's rays penetrate and pick up the color of whatever the air contains. Water droplets, dust, even smog serve to color the light. When the sun is high above, say between 10 AM and 2 PM, the suns rays pass through the thinnest portion of the air. They pick up the least amount of color and make the light ordinary and mundane.

When the sun is low,
the light passes through a greater amount of air which colors the light either yellow or red. That's why sunrises and sunsets are often so beautiful. Generally the "Golden Hour" is considered to be the time early in the morning about an hour after sunrise, or in the evening about an hour before sunset.

During this time,
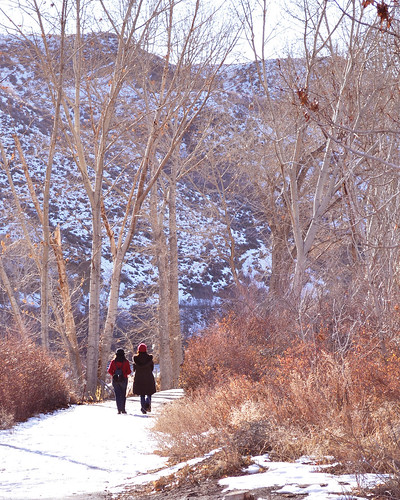
Light hits objects from the side giving us a broader view and letting us see into the depths. When shot from behind, this low angle light, wraps the subject and highlights the edges. Did you ever hear of a cloud's "silver lining"?
Also, shadows elongate and darken, adding depth to the scene.

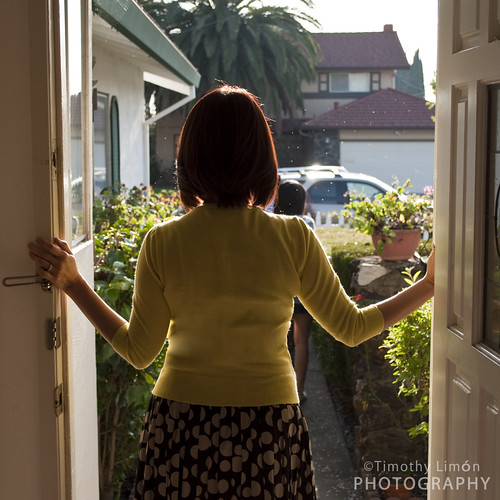
In the opening shot,
The model stands in the doorway looking out at some children playing in the yard outside. The light wraps her sweater and highlights the edges. Her hair glistens as it's bathed in the golden evening light. In the background, almost too subtle to notice, spring blossoms float on a gentle breeze.

Photography can change the way you see the world.
When you become interested in the art for the first time, you begin to appreciate light and its qualities. Each of us knows, that at a certain time in your home, the light will take on a golden glow and reach in through the window making the room come alive!


Enjoy!


Saturday, February 6, 2010

Your Own Worst Enemy


Have you ever wondered how people get so good?
What is it about them that allows their imagery to reach out and nourish another human soul? Then, when we look at our own work, we say to ourselves: "That shot could be better; The lighting is all wrong; The subject is in the wrong place..." Its as if we
have our own little critic that speaks to us inside our heads. We begin tearing ourselves down, whispering to ourselves "Your not good enough..." ...sigh...

I think that good artists are those who know how to turn off the critic within; They know how to have fun being creative and experience the shear joy of it in a childlike way.


I remember the first shot I took that sent a chill down my spine. My wife and her sister were walking far ahead of me on a snowy path that curved out of the frame. I was just playing with the camera and I snapped the shutter. When I saw the image on the LCD, my heart skipped a beat. The image I'd just made touched my soul. That shot was THE one that showed me that, even I, could be creative.

After that,
I bought all the right gear, began listening to several podcasts, and began re-learning all the teachings of the masters that surround us. I got to the point where I thought I was good. But there are so many others who are so far beyond me that lately, I find myself not willing to pick up the camera as often; I listen to my inner-critic: "I am not good enough."

I heard
an excellent interview today where a photographer,
Ibarionex R. Perello, spoke with an accomplished musician, Stephan Oberhoff. Stephan had a way of articulating how we grapple with our own self-doubt, and how it stops us from moving forward. He also spoke about allowing yourself the time of day to work on your art. The parallels from photographer to musician are many. Perhaps our own self-doubt is a quality all too human and thus difficult to recognize and deal with.

I was inspired by the interview.
It was as if I got a chance to know that even the most accomplished still have within themselves, that little voice that whispers.

I know now
that I have to keep trying. I have to give myself the time of day to just play, and create, then, I have to separate the "creative process" from the "critical process". I need to stop listening to the whispers

We all do!

Sunday, January 31, 2010

Yellow iMac

Being an early adopter has its benefits....
and its issues. Normally, being a tech geek, I don't mind putting up with the little glitches that I find along the way to a mature product; at least it gives me stories to tell about the experience, and a sense of pride paving the way for the general public (you can thank me now ;) ).

I recently switched to the Macintosh platform for photography after years of sitting on the fence. I purchased a brand new 27" iMac back in November only to be surprised that the unit I purchased was a DOA. You can read about that experience here.

A few days ago,
I was reading Gizmodo and took note of a post about continuing screen issues. Of particular interest to me was the issue about a yellow tint toward the bottom of the screen. As a photographer, color accuracy is really, REALLY important. At the time I was reading the post on my Win7 laptop, but quickly woke up the iMac to run the test they suggested.

Sure enough,
the replacement unit I now own is affected. Here's what it looks like using the blue and white stripes in iTunes:


I'll agree, that its hard to see, but the images below show how drastic this issue is when you compare from top to bottom. The top of the screen is on the left, the bottom is in the right. Notice the conspicuous "Absence of Blue" on the left.


Apple's tech support process starts on the website: I entered my serial number, described my issue, and entered a phone number. Within a minute the phone rang and I was put into the support queue. After about 3 minutes on hold I spoke with a nice young lady by the name of Phoebe, from Niagra falls, Canada. After apologizing several times, she informed me that Apple is aware of the issue and will either:

  1. Refund my money ...or...
  2. Put me on the list for a new internal display panel which will be available at the local Apple Store in 3 weeks

The refund didn't sound like a good option; I'd be without a main computer for a while and then have to configure and reload all of my software. I opted for option 2.

Overall I was impressed with Apple's response to the manufacturing (or shipping?) flaw and how forthright they are about it. I'm also impressed with Gizmodo's excellent coverage of the issue complete with a leaked internal memo about it. I fully knew what to expect.

So for now,
I'll keep using my yellow iMac, and anxiously await the arrival of the new panel. I'll update the post when the issue has been resolved. I think I'll wait a few months before buying an iPad :/

Sunday, January 24, 2010

Focus attention with a Vignette


"Great images rarely come straight from a great camera."

What you say? How can that be?

Well,
as most photographers will agree, there are certain techniques they've learned over the years to compose, light, frame, and edit that make their shots even better. Using a vignette is one such technique.

A vignette,
as defined by Wikipedia, is a "loss of clarity toward the corners of an image". Looking at the images above, you can see how the one on the right looks darker as you move away from the center. I needed to make the shot a little more interesting and draw the eye toward the center. The yellow vases behind compete with the blossom, so using a vignette is one way to do bring the eye to the subject.


Adobe Lightroom 3
makes this very easy to do; there's a slider for it called "Post-crop vignetting". Move it to the left and the corners go dark, to the right, and they go light. Because it's "post-crop" the image can be cropped in any way before the vignette is applied. Right now the Lightroom 3 beta is a free download and definitely worth checking out.

Adobe Camera Raw
within Photoshop CS4 has the same feature, but since you'll most likely edit the image inside CS4, its tough to go back into Camera Raw and change the slider after editing in Photoshop. A better way is to control it with layer from within CS4. There's a great tutorial listed below.

So, give it a try, but go lightly with it. The images here were overdone for illustration purposes. Subtlety is better for starters.

Enjoy!


Further reading:
Lightroom 3 beta (Mac or Windows)
Photoshop Vignette Tutorial
Flickr Vignetting Group

Monday, January 18, 2010

Sound Triggers


As a kid,
I loved pictures of things that happened too fast for the human eye to see. The beating of a hummingbirds wings frozen in time or the classic bullet slicing through a playing card photo always fascinated me.

When I started looking around...
at how to make such images, I found enough information to build something called a "sound trigger" This is a little electronic circuit that can fire a camera flash in a dark room when triggered by a sharp sound. Snap your fingers and the flash fires. Pretty neat!


Building the kit was fairly straight forward, but hooking it to the flash was not. I jury-rigged a hot shoe, of sorts, with some aluminum and speaker wire. It was crude, but it worked.

Now for the set up:
In order for this to work, you need a dark room and a remote shutter release. I set up in the garage with my camera on a tripod pointed at a board about 3 feet away. The camera was set to a 3-second exposure at f/4.5 and ISO 200 (manual focus of course). I turned off the lights and made my way back to the board where the camera was aiming using a flashlight. Here's the sequence of events:

  1. Grab an object to be broken (a CD, a light bulb etc...)
  2. Turn off the flashlight
  3. Remote trigger the shutter
  4. Break the object
  5. Wait for the shutter to close
  6. See what you got!
  7. Repeat

Because the flash...
fires so fast (about 1/10,000 of a second!) and the room is dark, the camera's sensor is able to capture the action at that speed. Its a pretty simple concept that can work with any camera with manual mode and a remote trigger.


It took a while to catch the action at just the right moment to make an interesting photo. To adjust when the flash fires, I needed to move the sound trigger either closer or farther from the breaking object. Sound take time to travel.

Another issue...
is that sometimes the falling pieces are loud enough to re-trip the flash and give you a double exposure. I found I had to time it so the shutter would close right after the object broke.

In the end I learned a great deal about this type of photography *and* got some pretty good images too! These are among my most popular on Flickr.

Give it a try! You might find its like being a kid again!

Further reading:

Sound Triggers
Flickr High Speed Group
Some Awesome Shots


Monday, January 4, 2010

Film Never Dies


Do you remember film?
In the years before digital cameras became so prevalent, the *only* way to capture an image was to shoot it on film. The canister was sold for a few bucks and held enough to expose a maximum of 36 exposures. Once shot, the film was rewound back into the metal canister and dropped off at the local store for developing. Wolf Camera, Costco, and Longs Drugs were among the many who offered 1-hour processing for standard 4x6" prints.

As digital imaging became affordable and the quality increased, film began to disappear. The LCD screen on the back of the camera gave us instant gratification. It also showed us that we had the right exposure, lighting and composition. Film began to fade away. Now the thought of waiting a hour to "see your shots" seems silly!

The other day,
I saw something that made me smile once again. I was shopping with my daughters at one of these kitchy clothing stores and noticed a display of Holga and Lomo film cameras. The boxes touted the surreal effect offered by the plastic lenses. These cameras actually looked *cool* I was impressed, very impressed.

There are many Flickr groups dedicated to film imagery. Among those worth checking out are the following:


So,
If you are looking for a new direction to take your art, or wish to revisit the depth that this old media offers, try film. Its worth a shot ;)


Sunday, January 3, 2010

Street Shooting (in a restarant?)


Normally, we define street shooting as candid photography out on the busy street. Either you, as the photographer move, or people, as the subjects, move. In general, longer lenses work best, as you can get candid shots of your subject from afar without being noticed. This assignment was a bit different; It involved shooting in close quarters at a local Dim Sum restaurant. We had invited my wife's parents along to enjoy the meal.

Dim Sum, for those of you who've not had the pleasure, consists of many small dishes served from carts that pass by each table. Each server asks if there is anything that you'd like, and then gives your the dish and adds it to your bill. Its like a moving parade of delectable Asian food. All you have to do is point and eat!


I stripped down my camera by removing the battery grip and using the shortest lens I have (Nikon 50mm f/1.4). I didn't bring a camera bag so as not to attract attention. I sat with the camera strap over my lap so the camera was hidden from view.

Luckily we were seated near a window and the overcast winter's day made the light wonderfully soft as it streamed in to the second story window.

I noticed that some of the servers were middle aged, their faces showed the character that the years of life brings. Carefully I raised my camera to my eye and began shooting.

No one seemed to mind as sat and pointed the lens in their general direction. It was refreshing for a change. Some of the servers even stopped to pose graciously as I snapped a few images and calmly put the camera back under the table.


I ended up with a few nice pictures that captured the whole experience. Imagine what else you could capture if you dare to bring your camera along. Don't be afraid to try something new. You may end up being surprised!