Wednesday, December 30, 2009

Imaging with High Dynamic Range (HDR)


What is HDR?
In order to compensate for image sensor limitations, photographers often combine several images to create a more realistic looking image. In the shot below, I combined 5 images to produce something close to what my eye sees when I look at this house at night.


Why Do it?
The human eye can see about 24 "stops" of dynamic range. Think of each "stop" as a doubling of the amount of light that our brain registers. When you look our the window on a sunny day, you can see the detail in the brightest objects as well as the detail in the darkest of shadows. 35 mm Film is able to capture about 14 stops of dynamic range. Even the best digital cameras can only capture about 11 stops which means that your fancy new DSLR is still lacking. Fear not, technology is constantly improving, and low light sensitivity is one area in which manufacturers can compete. In-camera HDR processing is already making its way to the market!

An Example
In the following picture, I exposed the sensor using 2 stops under the metered reading so as not to blow out the highlights in the image. As you can see, the shadows are completely void of detail.


In this next image, I exposed the sensor 2 stops over the metered value to capture as much detail in the shadows as possible. Notice that the highlights are completely blown out, lacking any detail.


Using Photoshop CS4, I was able to merge the 5 images (-2, -1, 0, +1, +2 stops) into one 32-bit image, which captured all the detail in both the highlights and the shadows.

So...?
Most images we see on the web have a bit depth of only 8 bits. Converting the 32 bit HDR down to an 8 bit image gives us some control over the relative brightness of highlights and shadows. This is where the magic happens. In the screen shot below, you see the histogram (a graphical way of showing how many pixels are in which brightness ranges) Clicking and dragging on the line over the histogram allows you to adjust the brightness of each particular range.

The goal here
is to get the final image to show detail in the shadows without loosing the detail in the highlights. I want to see the sky, the street, and the Christmas lights, just like what my eye sees. Like most things in Photoshop, just grab the handle and drag it until it looks bad, then back off until it looks good.


The final image shows enough detail to look realistic without being over done. For more reading on this subject, see Trey Ratcliff's excellent tutorial.
A couple of final notes here: This image was created completely inside of Photoshop using the 32 to 8 bit conversion. The technique is the same in CS3 and CS4.

Friday, December 18, 2009

Timing


Oftentimes, timing is everything...
in making a good image. You've seen shots where the artist captured the moment just at the right instant to tell a particular story. Such is the case with this image crafted by my wife on a beach trip a few years back.

In this shot,
we see a young child, my daughter, about to hit a beach ball into the ocean; Her wet hand reflects the sunlight drawing attention and explaining her stance. Her sister looks away adding a bit of mystery to the image.

My wife has a good eye,
and often just looks through the viewfinder, waiting for the precise moment to press the shutter. This time it payed off!

So the next time
you see your child doing something fun, or the light is just right as your cat lounges, try viewing the scene through your viewfinder for a while. Anticipate the actions and press the shutter. If your timing is right, you may just be surprised at what you capture!

Monday, December 14, 2009

Make a Good Shot Even Better with a Model


When you look at this shot what do you see?
The rustic fence's strong lines draw the viewer naturally down the path. The bright patch in the clearing serves as a destination for the eye that makes this photo somewhat pleasing. Overall its not a bad journey. It evokes a calm and peaceful feeling as well.

Now, What would make this a better shot?
Placing a model at the end of the road would certainly help, but there are a few considerations first.

  1. What she's wearing can either make her stand out or loose her to the background. A tan coat would be a poor choice with the colors in the clearing.
  2. Stance goes a long way in creating a feeling. Should she be coming to greet you or walking away? Should she stand stable and confident, or a bit tentative and unsure?
  3. Using a prop can help tell the story. In this example, a brightly colored umbrella would serve to attract the viewers attention. The way in which the umbrella can say a great deal as well. If she holds it askew it evokes a tentative feel. Imagine a tightrope walker with an umbrella in one hand and an out stretched arm to keep balance.
With these in mind, have a good look at the image below:


You can see...
In this simple example how adding a model adds so much more to an image. It tells a story for the viewer and evokes feelings not present in the original image.

So...
The next time you raise the camera to your eye, think of how adding the human element could tell yet another story.

Enjoy!

Thursday, December 3, 2009

The TWiP Two Model Shoot


One event,
two stunning models, three wardrobe changes, six professional lights and... 100 Bay Area photographers... made for a great way to spend a Monday evening!

The event was sponsored by SmugMug, Peachpit publishing, BorrowLenses.com, and Eye-Fi, each donating time, personnel, and products that made for a successful shoot.

Arriving early,
gave me a chance to meet the sponsors, greet the models and make-up artist, and help set up some of the lighting. Little by little the group began trickling in and, when it reached "critical mass", our TWiP (This Week in Photography Podcast) host Frederick Van Johnson, began the introductions.

Each model took her place and started taking direction from photographers one by one. One of the studio sets used a Pro-photo lighting trigger similar to the pocket wizard, but with the ability to adjust the intensity from the hot-shoe mounted transmitter. Pretty convenient and so easy to dial it in. The only way to go with all the various camera brands in the room!

Continuous tungsten lighting
on the other set made for an excellent way to see how the lighting would look on each model without firing test shots. True WYSIWYG at its best. The soft boxes did a good job at keeping the talent cool.

Overall, the participants were cordial
and respectful of the subjects. Few took the time to actually direct: "Turn away slightly, chin forward, half smile, look up okay...". Later on the models stated they liked being directed. It gave them a chance to see what the photographer was after.


It must have been daunting
for the models: posing for two hours in front of a hundred photographers. (I wished they would have played "Paparazzi" by Lady GaGa.) One commented that her cheeks began to hurt from smiling so much. Poor thing!

The mood was electrifying:
Flashes popping every second, hundreds of cameras, and really good talent in the room made for some exquisite imagery. Passers-by asked what all the commotion was. One even thought that there were movie stars in the room!


It all ended too soon. Before I knew it, we switched off the lights, folded up the backdrops, and said goodbye to our new friends. Not bad for a Monday night!


Wednesday, November 18, 2009

Wow, what a surprise!


See 11/19/2009 update below...


Many of my friends
and family members know me as a computer geek. I've built PC's for years, constantly upgrading and tweaking, overclocking, etc... I know my way around the PC world pretty well. I've even dabbled in Linux and have built up servers for all my music.


Lately, since photography has "captured" my interest,
I've been noticing the limitations of PC monitors. I can really tell the difference now that I sell licenses on iStock. I spend hours tweaking things on the photo to increase the chances of having it accepted for sale. Now I notice the corners of the screen are a bit darker than the center. The upper left has a green tinge, while the lower right has a purple one. You can imagine how difficult it is to edit on something like this.


So...I decided to get a Mac,

The Macintosh screens are known for their quality and precision. Most photographers I know use macs exclusively. This would be my first one. The new iMacs just came out and I fell in love with the 27" version: the quad-core. I agonized for weeks over the decision and finally made it two nights ago.

The purchase experience was awesome; Whoever designed that should get a big pat on the back. No registers, staff handling the transaction form anywhere in the store are nice touches. I was in and out in no time; albeit a few thousand bucks poorer. Carrying the heavy box to the car was a bit of a chore. The box was pretty...pretty heavy!

Once I got home,
one of my daughters helped with the ceremonial "un-boxing" It was a hoot setting it all up. I plugged in the power, turned on the wireless keyboard and the "magic mouse". I reached behind the smooth round rear of this gorgeous piece of hardware, found the subtle power button and pressed it ever so gently. I felt giddy with excitement!
I heard the drive whir and the glorious chime that macs make when they start up. My daughter and I jumped back and rubbed our hands together.....

Then????

Nothing... I heard the start-up routing asking me to choose a language, but no lights, no signs video at all??? Bbbut this is a Mac! this isn't supposed to happen, ever!


I saw John Hodgeman smirking at me.

A quick call
to the Apple Store and I was invited to bring it back for a quick exchange. "Has this ever happened before?" I asked. "Not to the quad-core's the salesman answered" Hmmm Some of the Mac forums say otherwise. Maybe this is a first production run quality issue. I just hope they have a replacement in stock, one that works!


So tomorrow,
I'll schlep the pretty and heavy box back to get an exchange from the cheerful folks at the Apple store. I'll post again with the experience and hopefully it will be a *nice* surprise this time!

Update 11/19/2009
On my lunch hour today, I paid a visit to the apple store. I met a lovely sales associate there who brought a cart out to my car to gingerly transport my DOA mac into the store. After verifying that the screen was in-fact dead, she returned with a brand new machine. I was in and out in about 30 minutes. I'm writing this post from the replacement machine now. The whole experience was pretty nice. I'll give Apple credit for their customer service!

Tuesday, November 10, 2009

Macro Shots -- On the Cheap


Lately
I've been inspired by some of the macro photography seen on Flickr. Years ago I had a Minolta X700 SLR. Being a college student at the time, I had little money for gear. One thing I did have that was relatively cheap was something called a "Reversing Ring"

This little gem threaded onto the front of my 50 mm lens (my *only* lens) and allowed it to be mounted backwards. Flipping the lens around moves the focal point further in front of the film plane of camera which does two things:

  1. It increases the magnification
  2. It decreases the minimum focal distance (allowing you to get really close to your subject)

Essentially, using a reversing ring converts your 50 mm "portrait lens" into a really nice "macro lens" and it does so for less that 20 bucks! There are no additional optics involved. There are some drawbacks to the reversing ring however, is that neither the aperture or the auto-focus works.

Getting a bonafide macro lens will set you back about 500 dollars, but you get full aperture and auto-focus control. Still, the limited utility make this route hard to fathom for the average hobbyist. I mean, with a macro lens, you can only shoot macros, right?

There is another low-cost solution.
Something called an "extension tube" can accomplish the same task as the spendy macro prime lens, but only costs about 90 bucks. Kenko offers a set of three for about $170. An extension tube mounts onto the back of your lens and then onto the front of your camera. They have electrical and mechanical pass-through connections that operate both the aperture and the auto-focus system on some cameras. Tubes come in various lengths (measured in mm) the longer the length, the higher the magnification.


In use,
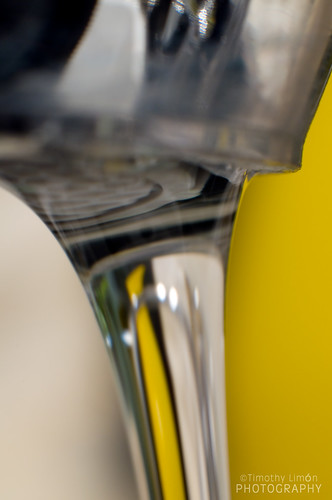
these tubes expose a whole new world of wonder. In the lead photo at the top, for example, a simple chrome handle becomes something magical, reflecting the entire room. If you look closely, you can see the blades of lens's aperture showing that it was stopped way down to get the maximum depth of field.

So consider
getting a reversing ring or an extension tube to get a new perspective on everyday objects. You'll be glad you did!

Further Reading:

Flickr Group "Closer and Closer"

Reversing Rings


Extension Tubes


Thursday, November 5, 2009

Frames Within Frames


As a photographer,
I've learned a great deal about composition. Making an image that captures the viewers interest is something we all strive for in this crowded world. Its a way we can stand out among thousands of others.


One of the ways
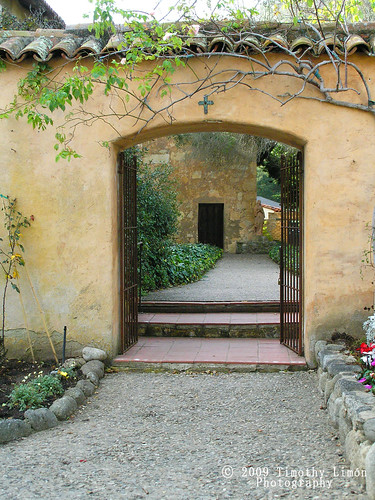
to compose an interesting image is to look for frames within frames. Our eyes are naturally drawn into the frame. Is it because we humans are natural-born explorers? Perhaps its because there is symmetry: the photo frame mimicks the subject frame.


Whatever it is,
composing an image like this is pretty easy to do and the results can make your image really pop. The next time your out with your camera, look for ways to frame your shot within a frame; you'll be surprised at how it turns out!