skip to main |
skip to sidebar
 What is "The Golden Hour"?
In the early days, I'd often heard of the phrase but wondered what it meant. Basically, the term refers to the time of day when the sun is low in the sky, where the color of light is stained by the atmosphere and the shadows are deep.
Think of it it like this:
Because we live on a spherical planet covered by a thin transparent atmosphere, the sun's rays penetrate and pick up the color of whatever the air contains. Water droplets, dust, even smog serve to color the light. When the sun is high above, say between 10 AM and 2 PM, the suns rays pass through the thinnest portion of the air. They pick up the least amount of color and make the light ordinary and mundane.
When the sun is low,
the light passes through a greater amount of air which colors the light either yellow or red. That's why sunrises and sunsets are often so beautiful. Generally the "Golden Hour" is considered to be the time early in the morning about an hour after sunrise, or in the evening about an hour before sunset.
During this time,
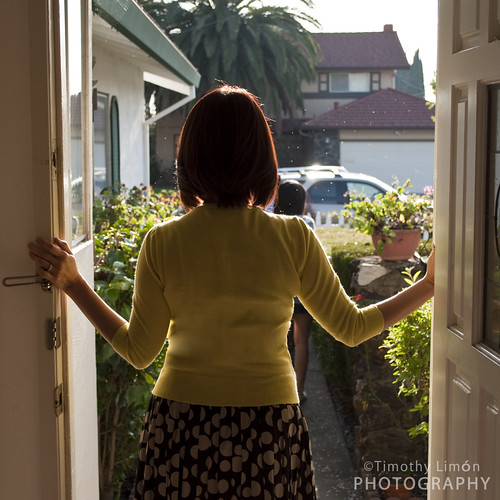
Light hits objects from the side giving us a broader view and letting us see into the depths. When shot from behind, this low angle light, wraps the subject and highlights the edges. Did you ever hear of a cloud's "silver lining"? Also, shadows elongate and darken, adding depth to the scene.
In the opening shot,
The model stands in the doorway looking out at some children playing in the yard outside. The light wraps her sweater and highlights the edges. Her hair glistens as it's bathed in the golden evening light. In the background, almost too subtle to notice, spring blossoms float on a gentle breeze.
Photography can change the way you see the world.
When you become interested in the art for the first time, you begin to appreciate light and its qualities. Each of us knows, that at a certain time in your home, the light will take on a golden glow and reach in through the window making the room come alive!
 Enjoy!
 What is HDR?In order to compensate for image sensor limitations, photographers often combine several images to create a more realistic looking image. In the shot below, I combined 5 images to produce something close to what my eye sees when I look at this house at night.Why Do it?The human eye can see about 24 "stops" of dynamic range. Think of each "stop" as a doubling of the amount of light that our brain registers. When you look our the window on a sunny day, you can see the detail in the brightest objects as well as the detail in the darkest of shadows. 35 mm Film is able to capture about 14 stops of dynamic range. Even the best digital cameras can only capture about 11 stops which means that your fancy new DSLR is still lacking. Fear not, technology is constantly improving, and low light sensitivity is one area in which manufacturers can compete. In-camera HDR processing is already making its way to the market!An ExampleIn the following picture, I exposed the sensor using 2 stops under the metered reading so as not to blow out the highlights in the image. As you can see, the shadows are completely void of detail.
 In this next image, I exposed the sensor 2 stops over the metered value to capture as much detail in the shadows as possible. Notice that the highlights are completely blown out, lacking any detail.
 Using Photoshop CS4, I was able to merge the 5 images (-2, -1, 0, +1, +2 stops) into one 32-bit image, which captured all the detail in both the highlights and the shadows.So...?Most images we see on the web have a bit depth of only 8 bits. Converting the 32 bit HDR down to an 8 bit image gives us some control over the relative brightness of highlights and shadows. This is where the magic happens. In the screen shot below, you see the histogram (a graphical way of showing how many pixels are in which brightness ranges) Clicking and dragging on the line over the histogram allows you to adjust the brightness of each particular range.The goal hereis to get the final image to show detail in the shadows without loosing the detail in the highlights. I want to see the sky, the street, and the Christmas lights, just like what my eye sees. Like most things in Photoshop, just grab the handle and drag it until it looks bad, then back off until it looks good.The final image shows enough detail to look realistic without being over done. For more reading on this subject, see Trey Ratcliff's excellent tutorial.A couple of final notes here: This image was created completely inside of Photoshop using the 32 to 8 bit conversion. The technique is the same in CS3 and CS4.



 Posts
Posts


